Setting up Disco
This document helps you to install Disco from source, either on a single server or a cluster of servers. This requires installation of some Prerequisites.
See also
Background
You should have a quick look at Technical Overview before setting up the system, to get an idea what should go where and why. To make a long story short, Disco works as follows:
Prerequisites
You need at least one Linux/Unix server. Any distribution should work (including Mac OS X).
On each server the following are required:
The same version of Erlang and Python should be installed on all servers. The default version of Python on the clients from which Disco jobs are submitted should also match that on the servers.
Optionally, DISCO_PROXY needs one of
Due to issues with unicode in Python2’s httplib library, we recommend installing the pycurl package. Disco will transparently use pycurl when available.
Install Disco
Short Version
git clone git://github.com/discoproject/disco.git $DISCO_HOME
cd $DISCO_HOME
make
cd lib && python setup.py install --user && cd ..
bin/disco nodaemon
Hint
Its convenient to add the disco command to your path.
Long Version
Download a recent version of Disco.
Extract the package (if necessary) and cd into it.
We will refer to this directory as DISCO_HOME.
Now compile Disco:
make
This is often the easiest and the least intrusive way to get started with Disco.
You should repeat the above command on all machines in your Disco cluster. You can also install disco systemwide:
make install
Install the python libraries for the local user:
cd lib
python setup.py install --user
cd ..
Or you can install these libraries in your favorite place.
Note
Disco must be located at the same path on all the nodes.
To start the master and enter its Erlang shell, without redirecting the log to a file, run:
bin/disco nodaemon
To start the master as a daemon and log to a file, use:
bin/disco start
Hint
If Disco has started up properly, you should be able to see its processes running:
ps aux | grep beam.*disco
If you don’t see any Disco processes, you may want to try Troubleshooting Disco installation.
Configure Authentication
Next we need to enable passwordless login via ssh to all servers in
the Disco cluster. If you have only one machine, you need to enable
passwordless login to localhost for the Disco user.
Run the following command as the Disco user, assuming that it doesn’t have valid ssh-keys already:
ssh-keygen -N '' -f ~/.ssh/id_dsa
If you have one server (or shared home directories), say:
cat ~/.ssh/id_dsa.pub >> ~/.ssh/authorized_keys
Otherwise, repeat the following command for all the servers nodeX
in the cluster:
ssh-copy-id nodeX
Now try to login to all servers in the cluster or localhost, if you
have only one machine. You should not need to give a password nor answer
to any questions after the first login attempt.
As the last step, if you run Disco on many machines, you need to make sure that all servers in the Disco cluster use the same Erlang cookie, which is used for authentication between Erlang nodes. Run the following command as the Disco user on the master server:
scp ~/.erlang.cookie nodeX:
Repeat the command for all the servers nodeX.
Warning
The Erlang cookie must be readable only to the disco user.
If it isn’t, run chmod 400 ~/.erlang.cookie on all the nodes.
Add nodes to Disco
At this point you should have Disco up and running. The final step, before testing the system, is to specify which servers are available for Disco. This is done via Disco’s web interface.
Point your browser at http://<DISCO_MASTER_HOST>:<DISCO_PORT>,
where DISCO_MASTER_HOST and DISCO_PORT should be
replaced with their actual values.
Normally you can use http://localhost:8989,
if you run Disco locally or through an SSH tunnel.
You should see the Disco main screen (see a screenshot).
Click configure on the right side of the page.
On the configuration page, click add row to add a new set of available nodes.
Click the cells on the new empty row, and add hostname of an available server
(or a range of hostnames) in the left cell,
and the number of available cores (CPUs) on that server in the right cell.
Once you have entered a value, click the cell again to save it.
Warning
Keep in mind that for more than one node, hostnames need to resolve globally (e.g. you should be relying on DNS to resolve hostnames, not /etc/hosts on an individual machine).
Hostnames used by Disco are shortnames, and not fully qualified hostnames. DNS must be configured to correctly resolve the shortnames of the hostnames in the cluster.
Disco cannot currently use raw IP addresses for hostnames. Short DNS hostnames must be used to name cluster nodes.
A relatively common mistake is that master is just an alias for the loopback address,
such as localhost, provided in /etc/hosts on the master machine.
In such cases, some nodes may not be able to resolve the master properly:
they may all resolve to themselves (if they all have the same hosts file),
nothing at all, or different machines (if they are configured differently).
You can add as many rows as needed to fully specify your cluster,
which may have varying number of cores on different nodes.
Click save table when you are done.
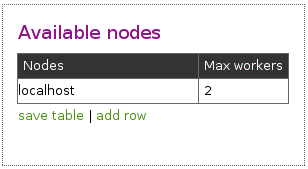
Add the localhost
If you have only a single machine, the resulting table should look like this, assuming that you have two cores available for Disco:
Add multiple nodes in the same line
You can also specify multiple nodes on a single line, if the nodes are named with a common prefix, as here:

This table specifies that there are 30 nodes available in the cluster, from
nx01 to nx30 and each node has 8 cores.
Test the System
Now Disco should be ready for use.
We can use the following simple Disco script that computes word frequencies in a text file to see that the system works correctly.
from disco.core import Job, result_iterator

def map(line, params):
    for word in line.split():
        yield word, 1

def reduce(iter, params):
    from disco.util import kvgroup
    for word, counts in kvgroup(sorted(iter)):
        yield word, sum(counts)

if __name__ == '__main__':
    job = Job().run(input=["http://discoproject.org/media/text/chekhov.txt"],
                    map=map,
                    reduce=reduce)
    for word, count in result_iterator(job.wait(show=True)):
        print(word, count)
Run the script as follows from DISCO_HOME:
python examples/util/count_words.py
Disco attempts to use the current hostname as DISCO_MASTER_HOST,
if it is not defined in any settings file.
If you are runing Disco on multiple machines you must use the same version of Python for running Disco scripts as you use on the server side.
You can run the script on any machine that can access the master. The safest bet is to test the script on the master node itself.
If the machine where you run the script can access the master node but
not other nodes in the cluster, you need to set DISCO_PROXY.
The proxy address should be the same as the master’s above.
This makes Disco fetch results through the master node,
instead of connecting to the nodes directly.
If the script produces some results, congratulations, you have a working Disco setup! If you are new to Disco, you might want to read the Tutorial next.
If the script fails, see the section about Troubleshooting Disco installation.